In this article, I’ve shown you how to execute simple REST API calls to the Cisco DNA Center using Postman. Today, we will switch to Python to build a couple of useful scripts.
Tools
To run REST API calls we will use Python3 with the requests library. It’s not installed by default, so make sure it’s present before jumping further.
Environment
For the purpose of this article, we will use a Cisco DNA Center Always-on Lab. It’s a free lab environment that everybody can access to test various functionalities.
The base URL for API calls will be https://sandboxdnac.cisco.com/dna/intent/api/v1/
To execute API calls, first, we need to obtain a token. The process is described below.
API Calls
The following chapters contain Python source code. If you’re interested in running those scripts on your local machine, you can easily access them from the Cisco DNA Center Automation Examples repository.
Devices
We will start with script that gathers information about all devices.
import requests
import json

USER = 'devnetuser'
PASSWORD = 'Cisco123!'
AUTH = requests.auth.HTTPBasicAuth(USER, PASSWORD)
AUTH_RESPONSE = requests.post('https://sandboxdnac.cisco.com/dna/system/api/v1/auth/token', auth=AUTH, verify=False)

TOKEN = json.loads(AUTH_RESPONSE.text)['Token']

HEADERS = { 'X-Auth-Token': TOKEN }

BASE_URL = 'https://sandboxdnac.cisco.com/dna/intent/api/v1'
RESOURCE = '/network-device'

call_response = requests.get(BASE_URL + RESOURCE, headers=HEADERS, verify=False)
devices = json.loads(call_response.text)['response']

for device in devices:
    print('Hostname: {hostname}, Type: {type}, MAC: {mac}, Serial: {serial}'.format(serial=device['serialNumber'],hostname=device['hostname'],type=device['type'],mac=device['macAddress']))
The script starts with authorization. It’s combined with two phases. First, we need to send a POST request with basic auth attributes. As a response, we get a token, that is used in further API requests.

The token is then placed in header of every call.
Now, we’re ready to send first call, that gathers all devices. The URL is following.
https://sandboxdnac.cisco.com/dna/intent/api/v1/network-deviceAfter parsing a response string, we get a Python dictionary with two keys:
- response
- version
The response key, that contains a list of 4 devices.

From now on, we can easily access the data using standard Python utilities. In the presented for loop, we’re looping through all devices, and printing the hostname, type, MAC address, and serial. The script output is presented below.
Hostname: asr1001-x, Type: Cisco ASR 1001-X Router, MAC: 00:c8:8b:80:bb:00, Serial: FXS1932Q1SE
Hostname: cat_9k_1.abc.inc, Type: Cisco Catalyst 9300 Switch, MAC: f8:7b:20:67:62:80, Serial: FCW2136L0AK
Hostname: cat_9k_2, Type: Cisco Catalyst 9300 Switch, MAC: f8:7b:20:71:4d:80, Serial: FCW2140L039
Hostname: cs3850, Type: Cisco Catalyst38xx stack-able ethernet switch, MAC: cc:d8:c1:15:d2:80, Serial: FOC1833X0AR
Interfaces
Let’s say that we want to print information about the network interfaces of all our devices. The following script accomplishes exactly that.
import requests
import json

USER = 'devnetuser'
PASSWORD = 'Cisco123!'
AUTH = requests.auth.HTTPBasicAuth(USER, PASSWORD)
AUTH_RESPONSE = requests.post('https://sandboxdnac.cisco.com/dna/system/api/v1/auth/token', auth=AUTH, verify=False)

TOKEN = json.loads(AUTH_RESPONSE.text)['Token']

HEADERS = { 'X-Auth-Token': TOKEN }

BASE_URL = 'https://sandboxdnac.cisco.com/dna/intent/api/v1'
RESOURCE = '/network-device'

call_response = requests.get(BASE_URL + RESOURCE, headers=HEADERS, verify=False)
devices = json.loads(call_response.text)['response']

for device in devices:
    RESOURCE = '/interface/network-device/{deviceId}'.format(deviceId= device['id'])
    call_response = requests.get(BASE_URL + RESOURCE, headers=HEADERS, verify=False)
    interfaces = json.loads(call_response.text)['response']

    print('Interfaces on {hostname}:'.format(hostname=device['hostname']))

    for interface in interfaces:
        print('\tName: {name}, Status: {status}, Port mode: {portMode}, '
              'Speed: {speed}'.format(name=interface['portName'],
                                      status=interface['status'],
                                      portMode=interface['portMode'],
                                      speed=interface['speed']))
The main difference between the previous and this script is that in this case, we have two for loops. To list all network interfaces of a particular device, first, we need to have the device id. That’s why the first API call gathers a list of all network devices, so we can iterate through them in the first for loop. For every asset, we’re taking the id, and with that, the new API call is combined. The URL for an interfaces REST API call is the following:
https://sandboxdnac.cisco.com/dna/intent/api/v1/interface/network-device/<id>As a response, we get a list of interfaces of a particular device. The structure of a single interface is presented in the screenshot below.
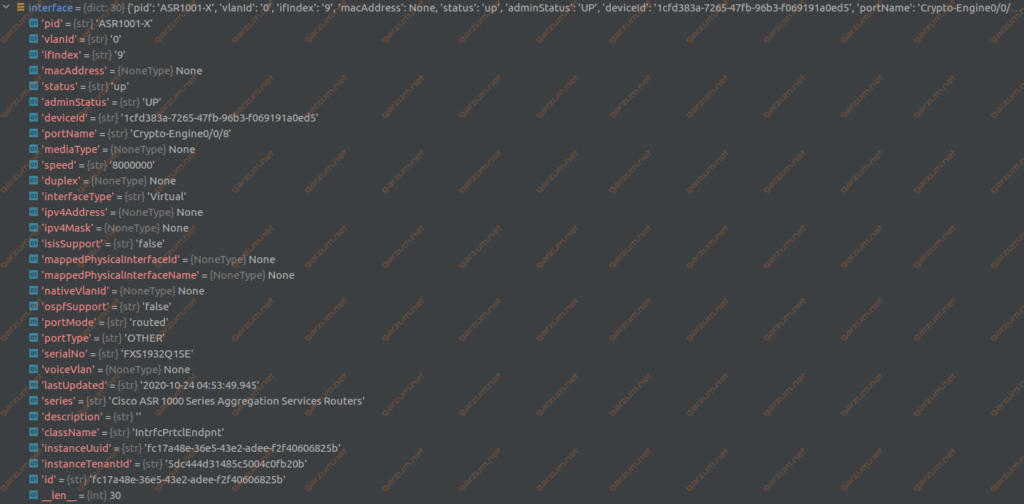
In the second for loop, we’re iterating through a list of interfaces. For every interface, the name, status, port mode, and speed attributes are printed.
Interfaces on asr1001-x:
	Name: Crypto-Engine0/0/8, Status: up, Port mode: routed, Speed: 8000000
	Name: GigabitEthernet0, Status: down, Port mode: routed, Speed: 1000000
	Name: GigabitEthernet0/0/0, Status: down, Port mode: routed, Speed: 1000000
	Name: GigabitEthernet0/0/1, Status: down, Port mode: routed, Speed: 1000000
	Name: GigabitEthernet0/0/2, Status: down, Port mode: routed, Speed: 1000000
	Name: GigabitEthernet0/0/3, Status: down, Port mode: routed, Speed: 1000000
	Name: GigabitEthernet0/0/4, Status: down, Port mode: routed, Speed: 1000000
	Name: GigabitEthernet0/0/5, Status: down, Port mode: routed, Speed: 1000000
	Name: Loopback0, Status: up, Port mode: routed, Speed: 8000000
	Name: TenGigabitEthernet0/0/0, Status: up, Port mode: routed, Speed: 10000000
	Name: TenGigabitEthernet0/0/1, Status: up, Port mode: routed, Speed: 10000000
	Name: VoIP-Null0, Status: up, Port mode: routed, Speed: 10000000
Interfaces on cat_9k_1.abc.inc:
	Name: FortyGigabitEthernet1/1/1, Status: down, Port mode: dynamic_auto, Speed: 40000000
	Name: FortyGigabitEthernet1/1/2, Status: down, Port mode: dynamic_auto, Speed: 40000000
	Name: GigabitEthernet0/0, Status: down, Port mode: routed, Speed: 1000000
	Name: GigabitEthernet1/1/1, Status: down, Port mode: dynamic_auto, Speed: 1000000
	Name: GigabitEthernet1/1/2, Status: down, Port mode: dynamic_auto, Speed: 1000000
	Name: GigabitEthernet1/1/3, Status: down, Port mode: dynamic_auto, Speed: 1000000
	Name: GigabitEthernet1/1/4, Status: down, Port mode: dynamic_auto, Speed: 1000000
	Name: Loopback0, Status: up, Port mode: routed, Speed: 8000000
	Name: Loopback1, Status: up, Port mode: routed, Speed: 8000000
	Name: TenGigabitEthernet1/0/1, Status: up, Port mode: access, Speed: 1000000
	Name: TenGigabitEthernet1/0/2, Status: down, Port mode: dynamic_auto, Speed: 10000000
	Name: TenGigabitEthernet1/0/3, Status: down, Port mode: dynamic_auto, Speed: 10000000
	Name: TenGigabitEthernet1/0/4, Status: down, Port mode: dynamic_auto, Speed: 10000000
	Name: TenGigabitEthernet1/0/5, Status: down, Port mode: dynamic_auto, Speed: 10000000
	Name: TenGigabitEthernet1/0/6, Status: down, Port mode: dynamic_auto, Speed: 10000000
	Name: TenGigabitEthernet1/0/7, Status: down, Port mode: dynamic_auto, Speed: 10000000
	Name: TenGigabitEthernet1/0/8, Status: down, Port mode: dynamic_auto, Speed: 10000000
	Name: TenGigabitEthernet1/0/9, Status: down, Port mode: dynamic_auto, Speed: 10000000
	Name: TenGigabitEthernet1/0/10, Status: down, Port mode: dynamic_auto, Speed: 10000000
	Name: TenGigabitEthernet1/0/11, Status: down, Port mode: dynamic_auto, Speed: 10000000
	Name: TenGigabitEthernet1/0/12, Status: down, Port mode: dynamic_auto, Speed: 10000000
	Name: TenGigabitEthernet1/0/13, Status: down, Port mode: dynamic_auto, Speed: 10000000
	Name: TenGigabitEthernet1/0/14, Status: down, Port mode: dynamic_auto, Speed: 10000000
	Name: TenGigabitEthernet1/0/15, Status: down, Port mode: dynamic_auto, Speed: 10000000
	Name: TenGigabitEthernet1/0/16, Status: down, Port mode: dynamic_auto, Speed: 10000000
	Name: TenGigabitEthernet1/0/17, Status: down, Port mode: dynamic_auto, Speed: 10000000
	Name: TenGigabitEthernet1/0/18, Status: down, Port mode: dynamic_auto, Speed: 10000000
	Name: TenGigabitEthernet1/0/19, Status: down, Port mode: dynamic_auto, Speed: 10000000
	Name: TenGigabitEthernet1/0/20, Status: down, Port mode: dynamic_auto, Speed: 10000000
	Name: TenGigabitEthernet1/0/21, Status: down, Port mode: dynamic_auto, Speed: 10000000
	Name: TenGigabitEthernet1/0/22, Status: down, Port mode: dynamic_auto, Speed: 10000000
	Name: TenGigabitEthernet1/0/23, Status: down, Port mode: dynamic_auto, Speed: 10000000
	Name: TenGigabitEthernet1/0/24, Status: down, Port mode: dynamic_auto, Speed: 10000000
	Name: TenGigabitEthernet1/1/1, Status: up, Port mode: routed, Speed: 10000000
	Name: TenGigabitEthernet1/1/2, Status: down, Port mode: dynamic_auto, Speed: 10000000
	Name: TenGigabitEthernet1/1/3, Status: down, Port mode: dynamic_auto, Speed: 10000000
	Name: TenGigabitEthernet1/1/4, Status: down, Port mode: dynamic_auto, Speed: 10000000
	Name: TenGigabitEthernet1/1/5, Status: down, Port mode: dynamic_auto, Speed: 10000000
	Name: TenGigabitEthernet1/1/6, Status: down, Port mode: dynamic_auto, Speed: 10000000
	Name: TenGigabitEthernet1/1/7, Status: down, Port mode: dynamic_auto, Speed: 10000000
	Name: TenGigabitEthernet1/1/8, Status: down, Port mode: dynamic_auto, Speed: 10000000
	Name: Vlan1, Status: up, Port mode: routed, Speed: 1000000
[...]
OSPF
For the last example, we will examine the interfaces with enabled OSPF. To accomplish that, we need to add some logic to the previous script.
import requests
import json

USER = 'devnetuser'
PASSWORD = 'Cisco123!'
AUTH = requests.auth.HTTPBasicAuth(USER, PASSWORD)
AUTH_RESPONSE = requests.post('https://sandboxdnac.cisco.com/dna/system/api/v1/auth/token', auth=AUTH, verify=False)

TOKEN = json.loads(AUTH_RESPONSE.text)['Token']

HEADERS = { 'X-Auth-Token': TOKEN }

BASE_URL = 'https://sandboxdnac.cisco.com/dna/intent/api/v1'
RESOURCE = '/network-device'

call_response = requests.get(BASE_URL + RESOURCE, headers=HEADERS, verify=False)
devices = json.loads(call_response.text)['response']

for device in devices:
    RESOURCE = '/interface/network-device/{deviceId}'.format(deviceId= device['id'])
    call_response = requests.get(BASE_URL + RESOURCE, headers=HEADERS, verify=False)
    interfaces = json.loads(call_response.text)['response']
    interfacesWithOSPF = []

    for interface in interfaces:
        if interface['ospfSupport'] == 'true':
            interfacesWithOSPF.append(interface)

    if len(interfacesWithOSPF) > 0:
        print('Interfaces with enabled OSPF on {hostname}:'.format(hostname=device['hostname']))

        for interface in interfacesWithOSPF:
            print('\t Name: {name}, IP: {ip}'.format(name=interface['portName'],
                                                     ip=interface['ipv4Address']))
    else:
        print('There are no interfaces with enabled OSPF on {hostname}'.format(hostname=device['hostname']))
The gathering of the interfaces is the same as in the previous example. After we have a full list of interfaces, we need to filter it, because now we’re interested only in interfaces that are configured for OSPF. To do that, we’re iterating through a list and checking if a particular device is OSPF-enabled. If so, we’re adding it to an interfacesWithOSPF list. If we take a look at the interface attributes, we can find an ospfSupport key. If the interface is OSPF-enabled, the value of ospfSupport key is set to ‘true’ .
The value of ospfSupport key is a ‘true’ string. Don’t confuse it with Python’s type True.
After we have a potential list of OSPF interfaces, we’re checking the length of it. If it’s above 0, we’re going through the for loop, to print information about each interface. The result is presented below.
There are no interfaces with enabled OSPF on asr1001-x
Interfaces with enabled OSPF on cat_9k_1.abc.inc:
	 Name: TenGigabitEthernet1/1/1, IP: 10.10.22.66
	 Name: Vlan1, IP: 10.10.22.97
Interfaces with enabled OSPF on cat_9k_2:
	 Name: TenGigabitEthernet1/1/1, IP: 10.10.22.70
	 Name: Vlan1, IP: 10.10.22.113
There are no interfaces with enabled OSPF on cs3850
Summary
I hope that the presented examples will ease your journey through the REST API of Cisco DNA Center. Despite the fact that the requests library is pretty straightforward, there is already built SDK to communicate with DNA Center, making it even simpler. More on that topic in the future.
2 thoughts on “Cisco DNA REST API calls with Python’s requests library”