In the previous article about Cisco Meraki, I’ve shown you a way to interact with REST API by using the requests library. This article is focused on a Meraki SDK, which provides an easier way to interact with Meraki.
Tools
To run REST API calls we will use Python3 with the meraki-sdk library. It’s not installed by default, so make sure it’s present before jumping further.
This tutorial is based on abandoned meraki-sdk library that was written for Meraki Dashboard v0. As for now (Feb 2024) there is new Dashboard API v1, which with this sdk is not compatibile.
Article left for educational purposes. Actualized content is available here.
Environment
We will use the Cisco Meraki Always on sandbox. It’s a free lab environment that everybody can access to test various Meraki functionalities.
The base URL for API calls will be https://api.meraki.com/api/v0
For authentication we will use a API key, at the time of this article writing, API key is: 6bec40cf957de430a6f1f2baa056b99a4fac9ea0
You can find Cisco Meraki API documentation here.
API Calls
The following chapters are containing Python source code. If you’re interested in running those scripts on your local machine, you can easily access them on the Gitlab repository.
Organizations
Let’s start with gathering information about all organizations in the Meraki ecosystem.
from meraki_sdk.meraki_sdk_client import MerakiSdkClient

API_KEY = '6bec40cf957de430a6f1f2baa056b99a4fac9ea0'

meraki = MerakiSdkClient(API_KEY)

organizations = meraki.organizations.get_organizations()

for organization in organizations:
    print('ID: {id}, Name: {name}'.format(id=organization['id'], name=organization['name']))
First of all, we need to import a MerakiSdkClient from meraki-sdk library. To access a sandbox, we need to authenticate with an API key, which placed in the API_KEY variable.
The next step is to use the meraki-sdk library. We’re creating an instance of MerakiSdkClient class. As an argument, we need to provide an API key.
Now we’re ready to use the Meraki SDK! To fetch organizations, we can use the get_organizations method.
Let’s check how’s the structure of organizations variable in the debugger.

As we can see, the organizations variable is a list. Each element is a dictionary with specific organization data. Since the gathered output is already converted to the Python native structures, we’re ready to process it. It’s worth to mention, that Meraki SDK automatically did a REST API call for us, and also parsed the output from the Unicode format to the Python structures. In the case of using the requests library, we have to convert the output by ourselves.
The for loop prints ID and name of each organization.
ID: 865776, Name: Cisco Live US 2019
ID: 575334852396582924, Name: My organization
ID: 575334852396582684, Name: SVR
ID: 575334852396582603, Name: 123456
ID: 575334852396582591, Name: Ftreqah organization
ID: 575334852396582607, Name: Andy Thanh
ID: 575334852396582979, Name: DevNet Test Org
ID: 575334852396582590, Name: Ftreqah organization
ID: 575334852396582739, Name: My organization
ID: 575334852396582969, Name: Test_org_666
[...]
Networks
Now let’s move on to the networks. Each network is assigned to an organization and to get the networks list, we have to specify the organization ID. We can use the code snippet from the previous step.
from meraki_sdk.meraki_sdk_client import MerakiSdkClient

API_KEY = '6bec40cf957de430a6f1f2baa056b99a4fac9ea0'

meraki = MerakiSdkClient(API_KEY)

organizations = meraki.organizations.get_organizations()

for organization in organizations:
    print('ID: {id}, Name: {name}'.format(id=organization['id'], name=organization['name']))

    collect = {
        'organization_id': organization['id'],
    }

    networks = meraki.networks.get_organization_networks(collect)

    if len(networks) > 0:
        print('Printing networks for organization {name}:'.format(name=organization['name']))

        for network in networks:
            print('\tID: {id}, Name: {name}, Type: {type}'.format(id=network['id'],
                                                                  name=network['name'],
                                                                  type=network['type']))
Here we have an additional for a loop. We’re iterating through a list of organizations, and for each of them, we’re fetching an ID, which is saved in a collect dictionary.
Now we’re ready to gather the list of networks for a specified organization. We’re passing a collect dictionary as an argument to the get_organization_networks method. As a response, we get a list of networks in the networks variable. Let’s dive into the debugger.
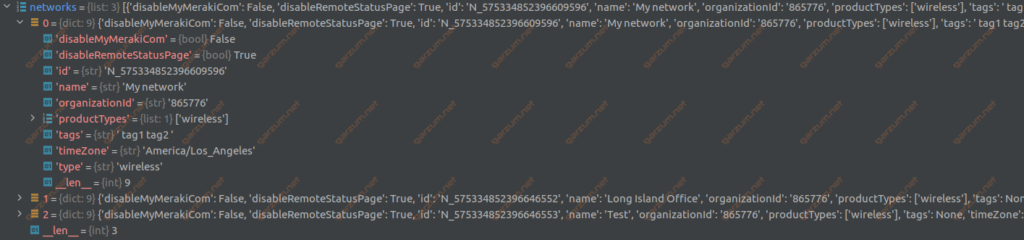
As you can see, we have a list of networks. Each network is represented as a dictionary with the data.
Since we have all the data represented as Python structures, we can print it. There is also an if statement, it’s present because not all organizations have assigned networks. In such a case, we’re printing appropriate information.
ID: 865776, Name: Cisco Live US 2019
Printing networks for organization Cisco Live US 2019:
	ID: N_575334852396609596, Name: My network, Type: wireless
	ID: N_575334852396646552, Name: Long Island Office, Type: wireless
	ID: N_575334852396646553, Name: Test, Type: wireless
ID: 575334852396582986, Name: DevNet Test Org
Printing networks for organization DevNet Test Org:
	ID: L_575334852396597311, Name: Site Number 1, Type: combined
	ID: L_575334852396597312, Name: Site Number 2, Type: combined
	ID: L_575334852396597313, Name: Site Number 3, Type: combined
	ID: L_575334852396597314, Name: Site Number 4, Type: combined
	ID: L_575334852396597315, Name: Site Number 5, Type: combined
ID: 575334852396582916, Name: My organization
ID: 575334852396582969, Name: Test_org_666
ID: 575334852396582738, Name: My organization
[...]
Devices
In the last example, we will fetch the network devices that are assigned to a particular network. To accomplish this, we need to have a network ID. Since we have a list of networks for all organizations, we can use it in this case.
from meraki_sdk.meraki_sdk_client import MerakiSdkClient

API_KEY = '6bec40cf957de430a6f1f2baa056b99a4fac9ea0'

meraki = MerakiSdkClient(API_KEY)

organizations = meraki.organizations.get_organizations()

for organization in organizations:
    print('ID: {id}, Name: {name}'.format(id=organization['id'], name=organization['name']))

    collect = {
        'organization_id': organization['id'],
    }

    networks = meraki.networks.get_organization_networks(collect)

    if len(networks) > 0:
        print('Printing networks for organization {name}:'.format(name=organization['name']))

        for network in networks:
            print('\tID: {id}, Name: {name}, Type: {type}'.format(id=network['id'],
                                                                  name=network['name'],
                                                                  type=network['type']))

        devices = meraki.devices.get_network_devices(network['id'])

        for device in devices:
                if 'name' in device:
                    print('\tName: {name}, Model: {model}, Serial: {serial}'.format(name=device['name'],
                                                                                    model=device['model'],
                                                                                    serial=device['serial']))
                else:
                    print('\tModel: {model}, Serial: {serial}'.format(model=device['model'],
                                                                      serial=device['serial']))
        else:
            print('There are no devices assigned to the network {network}'.format(network=network['name']))
First of all, we need to gather all devices for a particular network. It can be done by issuing a get_network_devices method with network ID as an argument. Let’s take a look at the result from the debugger.
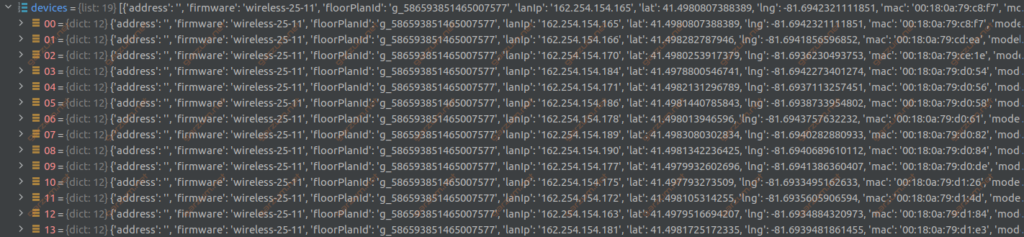
We have a list with dictionaries, each represents a network device.
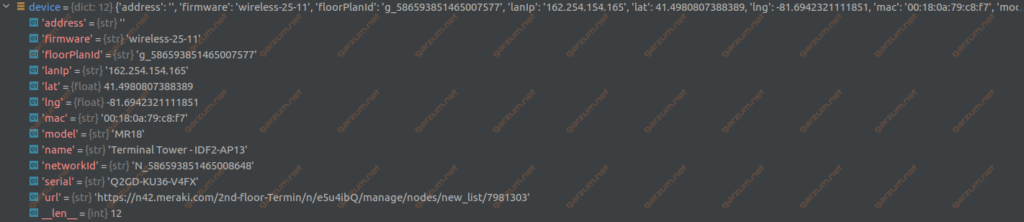
Since we have all the information, we’re iterating through each device and printing desirable data.
[...]
ID: 566327653141842188, Name: DevNetAssoc
Printing networks for organization DevNetAssoc:
	ID: L_566327653141858539, Name: DevNetAssoc1, Type: combined
	ID: L_566327653141858540, Name: DevNetAssoc2, Type: combined
	ID: L_566327653141858541, Name: DevNetAssoc3, Type: combined
	ID: L_566327653141858542, Name: DevNetAssoc4, Type: combined
	ID: L_566327653141858543, Name: DevNetAssoc5, Type: combined
	Model: MX67, Serial: QBSA-KS3Y-RHCH
	Model: MS120-8FP, Serial: QBSB-AN5N-M9XC
	Model: MV12W, Serial: QBSD-99R4-UBTW
	Model: MR20, Serial: QBSC-GCDY-RXMK
[...]