There are several situations in which you would like to install an operating system on your network device. One of them is when you receive a brand new switch, without pre-installed OS. In this article, I’ll cover the installation of TiMOS on the Nokia 7210 SAS-Sx in the standalone mode using pendrive.
There are the following ways to install networking OS:
- Pendrive
- Network
- External SD card slot
TiMOS installation procedure
1. Download OS
First of all, make sure to download the desired TiMOS version. You can get it from the vendor site. In this case, a 10.0.R9 version will be installed.
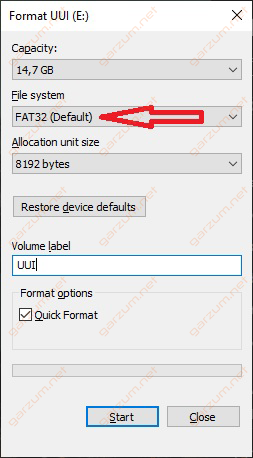
2. Format pendrive
USB storage has to be formatted as FAT16 or FAT32. On Windows 10 you can do it under Format… option of your pendrive.
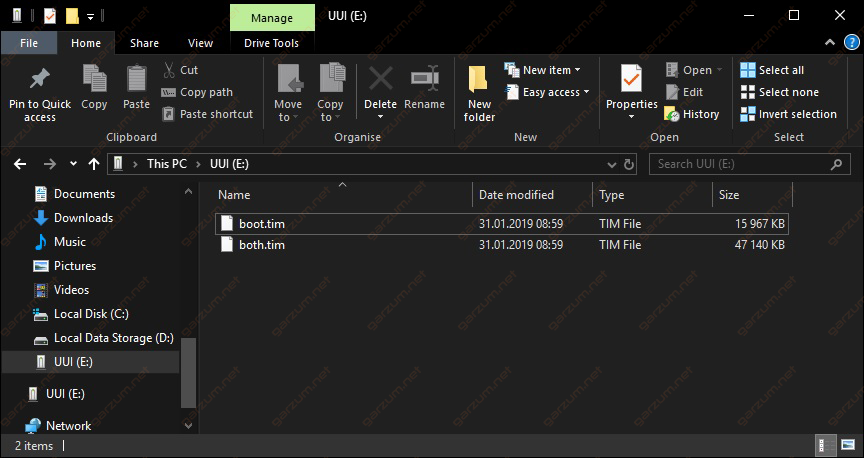
3. Copy files to the USB stick
In the downloaded archive, search for boot.tim and both.tim files. Copy them to the pendrive. You don’t have to create any directory, place them in the main directory.
4. Boot switch using pendrive
Place pendrive in the switch USB port and connect the power cable. From now on, you can monitor the booting process in the console. Down below you can see part of the output gathered during the boot time.
Nokia 7xxx Boot ROM. Copyright 2000-2017 Nokia.
All rights reserved. All use is subject to applicable license agreements.
Build: X-9.0.R7 on Thu Jun 15 12:51:28 IST 2017 by builder
Version: 0x37
Processor core is CN66xx
COLD boot on processor #1
?Preparing for jump to RAM...
Starting bootrom RAM code...
CPU #1 booted from working sector
Boot rom version is v55
CPU Control FPGA version is 0x29
Restart type = 0x01
>>>Testing  SDRAM from 0x0000000002200000 to 0x0000000080000000
>>>Testing  SDRAM from 0xffffffffe0000000 to 0xffffffffe2000000
Power on Diagnostics passed
Board Serial Number is 'NS0123T4567'

Total Memory: 2GB  Chassis Type: 0xa  Card Type: 0x43
                                                     TiMOS-V-9.0.R7 bootrom/hops
Nokia SAS-Sx 64SFP+4CFP4 7210 Copyright (c) 2000-2017 Nokia.
All rights reserved. All use subject to applicable license agreements.
Built on Thu Jun 15 12:49:57 IST 2017 by builder in /home/builder/9.0B1/R7/panos/main


Searching for boot.tim on local drives:
Attempting to load file cf1:/boot.tim
Cannot open "cf1:/boot.tim".
Attempting to load file cf2:/boot.tim
Cannot open "cf2:/boot.tim".
Attempting to load file uf1:/boot.tim
Version L-10.0.R9, Thu Jan 31 12:30:24 IST 2019 by sasbuild in /home/sasbuild/10.0B1/R9/panos/main
text:(13382784-->39550896) + data:(2965696-->18167316)
Starting at 0x18000000...
During the boot time, switch searches for OS image in the following order:
- cf1:/ – internal flash memory
- cf2:/ – external flash memory (SD card)
- uf1:/ – external memory (USB)
5. Login and disable auto-init
Use default credentials to log in:
username: admin
password: admin
TiMOS-B-10.0.R9 both/hops Nokia SAS-Sx 64SFP+4CFP4 7210 Copyright (c) 2000-2019                                                                                                              Nokia.
All rights reserved. All use subject to applicable license agreements.
Built on Thu Jan 31 12:34:45 IST 2019 by sasbuild in /home/sasbuild/10.0B1/R9/pa                                                                                                             nos/mai


Auto-Init loaded factory TiMOS image from local flash. System will reboot automa                                                                                                             tically after 5 minutes.
Run commnad 'admin auto-init stop' to avoid auto-reboot...
Login: admin
Password:
*A:GARZUMdotNET#
As you can see in the logs above, the switch will be automatically rebooted in 5 minutes. To avoid such action, disable auto-init with the following command.
*A:GARZUMdotNET# admin auto-init stop6. Copy OS image to local flash memory
Use the following commands to copy boot.tim and both.tim to the internal flash memory.
*A:GARZUMdotNET# file copy uf1:\both.tim cf1:\
Copying file uf1:\both.tim ... OK
1 file copied.
*A:GARZUMdotNET# file copy uf1:\boot.tim cf1:\
Copying file uf1:\boot.tim ... OK
After the copy operation is completed, you can reboot the device.
*A:GARZUMdotNET# admin reboot
WARNING: Configuration and/or Boot options may have changed since the last save.
Are you sure you want to reboot (y/n)? y

Resetting...OK
Final configuration and check
After the device reboot, you can unplug your pendrive. In the boot process, you can see, that switch found OS image in the internal flash cf1:/ storage.
Searching for boot.tim on local drives:
Attempting to load file cf1:/boot.tim
Version L-10.0.R9, Thu Jan 31 12:30:24 IST 2019 by sasbuild in /home/sasbuild/10.0B1/R9/panos/main
text:(13382784-->39550896) + data:(2965696-->18167316)
Starting at 0x18000000...
When the boot process is completed, you can log in to the device using default credentials. Once again you have to disable auto-init with the same command as previously. After that, your switch is fully operational and ready!
Very helpful article 🙂 Thanks!