In this article, I want to shed some light on the configuration of routed VPLS’es on Nokia 7750 equipment. The basic VPLS configuration allows only communication between hosts within that VPLS. Sometimes there is a need to provide communication between hosts, that are in different VPLS’es, and R-VPLS comes in handy in such a scenario.
Configuration
There are two ways to configure routed VPLS:
- Routed VPLS with IES
- Routed VPLS with VPRN
Both IES and VPRN are service types available on the Nokia 7750 router. The configuration is similar in both cases, but there are differences in the mode of operation, which are highlighted later in this article.
Basic VPLS configuration
Let’s start with a basic VPLS configuration. In this scenario, we have one Nokia 7750 router with 2 hosts connected to it. Each host is placed in different VPLS:
- Host 1 – VPLS 100
- Host 2 – VPLS 200
Note that the subnets are different in both VPLS’es, for VPLS 100 we have 10.0.100.0/24, and for VPLS 200, 10.0.200.0/24.
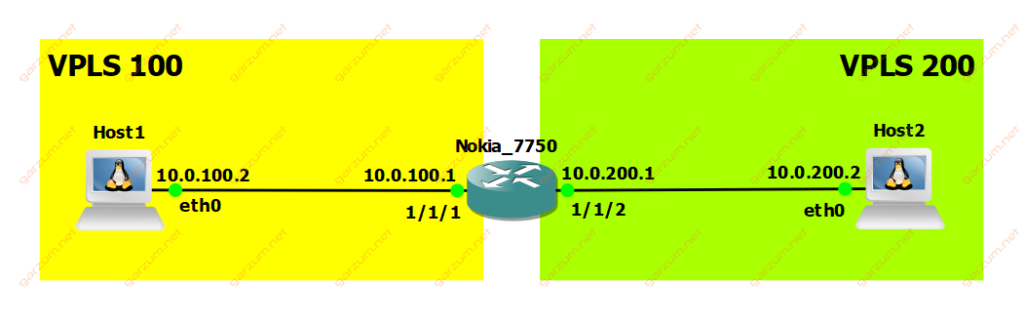
On the diagram you can see the ip addresses on the router side. They’re configured later in additional services.
Down below you can find the service configuration.
#--------------------------------------------------
echo "Service Configuration"
#--------------------------------------------------
    service
        customer 1 create
            description "Default customer"
        exit
        vpls 100 customer 1 create
            stp
                shutdown
            exit
            sap 1/1/1 create
            exit
            no shutdown
        exit
        vpls 200 customer 1 create
            stp
                shutdown
            exit
            sap 1/1/2 create
            exit
            no shutdown
        exit
    exit
Since hosts are in different VPLS’es and subnets, they can’t communicate with each other without additional configuration.
To configure routed VPLS, we need to slightly change the configuration. First of all, we need to allow binding of a VPLS to the ip interface, we can achieve that with an allow-ip-int-bind command.
A:Nokia_7750# /configure service vpls 100
A:Nokia_7750>config>service>vpls# allow-ip-int-bind
A:Nokia_7750# /configure service vpls 200
A:Nokia_7750>config>service>vpls# allow-ip-int-bind
The next step is to assign a name to both VPLSes, each name must be unique. For the purpose of this article, I’ve named VPLS 100 – “vpls100”, and VPLS 200 – “vpls200”. To set the service name, we have to type the service-name command.
A:Nokia_7750# /configure service vpls 100
A:Nokia_7750>config>service>vpls# service-name vpls100
A:Nokia_7750# /configure service vpls 200
A:Nokia_7750>config>service>vpls# service-name vpls200
On some Nokia platforms, such as Nokia 7250-IXR-10, the service-name command is not available. The name is defined during the creation of a VPLS. The proper way to create VPLS 100 with a name would be:
A:Nokia_7250# configure service vpls 100 name “vpls100” customer 1 create
The complete services configuration is listed below.
        vpls 100 customer 1 create
            allow-ip-int-bind
            exit
            stp
                shutdown
            exit
            service-name "vpls100"
            sap 1/1/1 create
            exit
            no shutdown
        exit
        vpls 200 customer 1 create
            allow-ip-int-bind
            exit
            stp
                shutdown
            exit
            service-name "vpls200"
            sap 1/1/2 create
            exit
            no shutdown
        exit
We can check if the VPLSes are operational with show service service-using command.
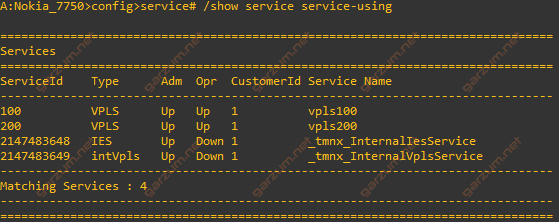
The command output indicates, that both VPLS’es are operational. In the last column, you can see the assigned earlier service name.
Now we can move to the configuration of additional services, that will give us a routed VPLS functionality.
Routed VPLS based on IES
The first routed VPLS configuration method is based on IES. The essence of this approach is to create additional service – IES, create routed interfaces, and then assign a VPLS to the corresponding routed interface.
First of all, let’s create IES service.
A:Nokia_7750# configure service ies 1 customer 1 createThe next step is to create a logical routed interface.
*A:Nokia_7750>config>service>ies$ interface rvpls_100 createAfter creating the interface, we’re placed in an interface configuration mode. Here we have to assign ip address and attach the interface to the corresponding VPLS using the service name.
*A:Nokia_7750>config>service>ies>if$ address 10.0.100.1/24
*A:Nokia_7750>config>service>ies>if$ vpls vpls100
And here’s a complete configuration for routed interface for VPLS 100.
            interface "rvpls_100" create
                address 10.0.100.1/24
                vpls "vpls100"
                exit
            exit
The configuration of the second interface is analogous.
            interface "rvpls_200" create
                address 10.0.200.1/24
                vpls "vpls200"
                exit
            exit
The last step is to enable IES service by issuing no shutdown command. The complete service configuration looks like this.
        ies 1 customer 1 create
            interface "rvpls_100" create
                address 10.0.100.1/24
                vpls "vpls100"
                exit
            exit
            interface "rvpls_200" create
                address 10.0.200.1/24
                vpls "vpls200"
                exit
            exit
            no shutdown
        exit
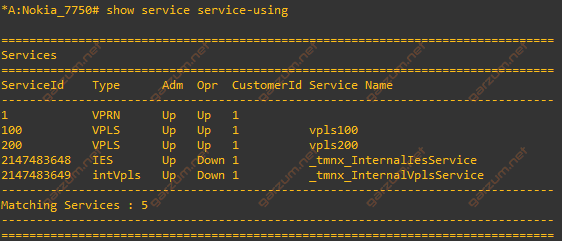
We can check if service is operational in the show service service-using command output.
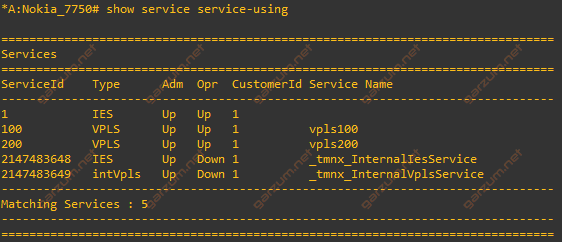
In this case, IES is up and running.
The created interfaces are visible in the router interfaces section. We can display them by issuing the show router interface command.
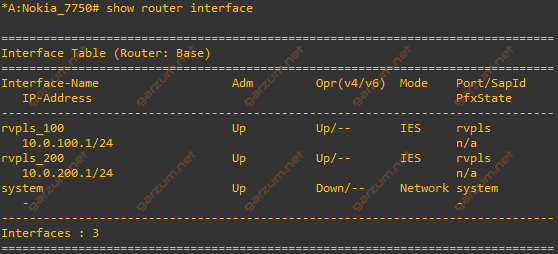
Both interfaces are operational. Let’s check connectivity from Host1 to Host2.
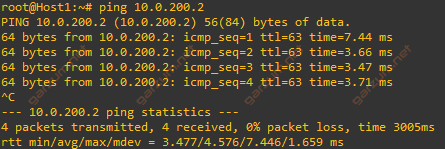
Connectivity test was successful, which imples that R-VPLS is working correctly.
Routed VPLS based on VPRN
The R-VPLS configuration based on VPRN is similar to the IES configuration. First, we have to create a VPRN service and then configure two routable interfaces. Here’s the complete configuration.
        vprn 1 customer 1 create
            route-distinguisher 65535:1
            interface "rvpls_100" create
                address 10.0.100.1/24
                vpls "vpls100"
                exit
            exit
            interface "rvpls_200" create
                address 10.0.200.1/24
                vpls "vpls200"
                exit
            exit
            no shutdown
        exit
The main configuration difference between VPRN and IES is that in VPRN you have to configure route-distinguisher, without it, the VPRN service won’t be operational.
We can check service status by issuing show service service-using command.
The second difference is that VPRN is a virtual router service, so created interfaces won’t be visible in the base routing table. To display VPRN interfaces, we have to specify the VPRN service id in the show command. Since service id is 1, the command would be show router 1 interface.
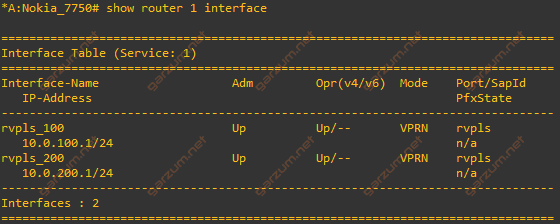
Both interfaces are operational, so let’s check connectivity between hosts.
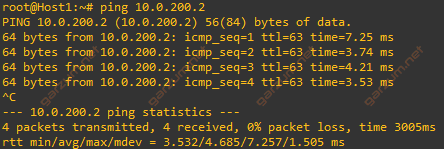
Connectivity was successful.
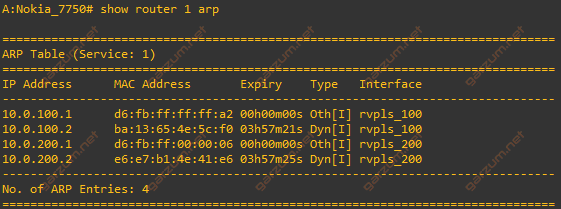
Sometimes it might be helpful to display the arp entries for troubleshooting purposes. We can accomplish that by issuing a show router 1 arp command.
WOW…. Can you please post more Nokia articles??? I come from a cisco route/switch environment to now a Nokia service provider environment and I cannot begin to explain how HELPFUL these have been… Honestly can’t believe I found this. The way you explain everything, and the screenshots.
PLEASE make more!!
Thank you so much!
Hi David. I’m very happy to hear that those articles are helpful to you! Currently, I’m planning to write more Cisco-related posts. Also, I’m changing my job, so I don’t know if I’ll be working with Nokia equipment there. But I’m not closed regarding Nokia devices so maybe there will be more articles in the future 🙂