Basic traffic generation is the essence of automating Spirent because we can build on top of that. Do you want to check how your network behaves under great load? Or you’re curious if it will sustain traffic from many clients at one time. A common part of those scenarios is traffic generation, so today we will automate basic Spirent traffic flow with REST API in Python.
Environment
Before jumping to the code, let’s take a look at the network topology.
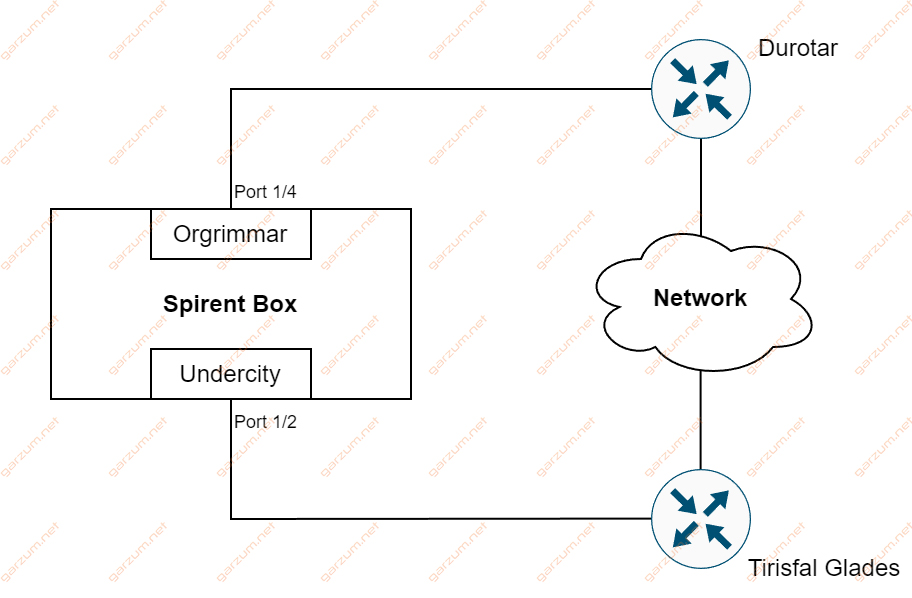
Starting from the left we have a Spirent device with two interfaces. Both of them are connected to the Cisco routers called Durotar and Tirisfal Glades. Routers on the other hand are interconnected by data network.
This configuration looks like a circle. Our goal is to send traffic from Spirent port 1/4, to reach port 1/2.
Now let’s take a glance at the IP configuration.
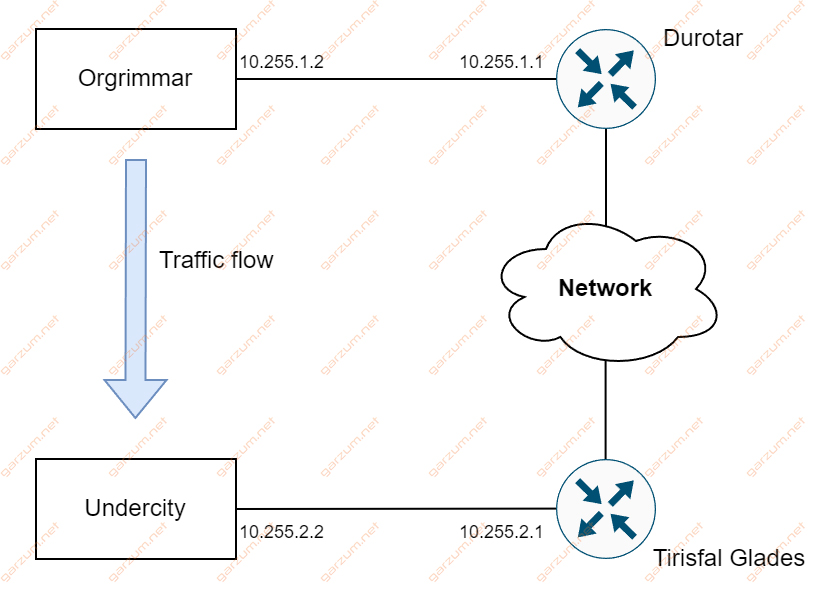
To accomplish our goal, we will create two emulated devices on the Spirent – Orgrimmar and Undercity. Traffic will be generated by Orgrimmar, it will go through Durotar and Tirisfal Glades routers, to finally reach the other side – Undercity.
Enough theory, let’s code!
The code
Session
In the beginning, we have to join a session and create a project.
# Connection variables
spirent_box = "10.0.0.1"
stc_server = "10.0.1.1"
port = 8888

# Session variables
user_name = "Garzum"
session_name = "Script"
session_id = f"{session_name} - {user_name}"


stc_session = stchttp.StcHttp(stc_server, port=port)
stc_session.new_session(
    user_name=user_name, session_name=session_name, kill_existing=True
)
stc_project = stc_session.create("project")
If you need more details about those operations, make sure to check my previous article on this topic.
Emulated devices
Our goal is to send network traffic from the Orgrimmar to Undercity. In order to achieve that, we need to create those virtual devices.
In Spirent nomeclature, we’re operating on emulated devices. I use virtual and emulated devices interchangeably, but I mean the same thing.
orgrimmar_device = stc_session.create(
    "EmulatedDevice", under=stc_project, EnablePingResponse="TRUE"
)
undercity_device = stc_session.create(
    "EmulatedDevice", under=stc_project, EnablePingResponse="TRUE"
)

orgrimmar_eth = stc_session.create("EthIIIf", under=orgrimmar_device)
undercity_eth = stc_session.create("EthIIIf", under=undercity_device)

orgrimmar_ip = stc_session.create(
    "Ipv4If",
    under=orgrimmar_device,
    Address="10.255.1.2",
    Gateway="10.255.1.1",
    PrefixLength="24",
)
undercity_ip = stc_session.create(
    "Ipv4If",
    under=undercity_device,
    Address="10.255.2.2",
    Gateway="10.255.2.1",
    PrefixLength="24",
)
We’re starting with the creation of emulated devices, both are created by using the create method. We will use it often, so let’s take a closer look.
The first argument is a string containing object type. A list of available object types is published by Spirent in the official documentation, more specifically in the Automation Object Reference. You can find it on the official Spirent website.
Following the object type we have to specify the project, under which the object will be created. In our case, we have a project handler in the stc_project variable.
After that, we have arguments specifying the created object configuration. In our case, we’re passing just one – EnablePingResponse=”TRUE”, because we want to be able to ping our virtual devices.
It’s worth noting, that the EmulatedDevice object has a lot of configuration options, but if we don’t specify them, they will have default values. The same rule applies to all created devices. If you’re curious what configuration options each object has, and what default value is assigned – take a look at Spirent TestCenter Automation Object Reference.
The next objects that we need to create are Ethernet configurations for both emulated devices. For that, we have the EthIIIf object type. Their default values meet our requirements, so we’re just specifying the object type and project during creation.
In the end, we have to configure Layer 3 parameters. To achieve that, we’re creating IP configurations for both devices. In this case, we have an object type of Ipv4If with parameters such as IP address, mask, and gateway.
Ports
Now, we can go on with the port configuration.
stc_session.connect(spirent_box)

port_locations = ["//10.0.0.1/1/2", "//10.0.0.1/1/4"]
port_handlers = [
    stc_session.create("Port", under=stc_project, Location=port)
    for port in port_locations
]
port2_handler = port_handlers[0]
port4_handler = port_handlers[1]

stc_session.perform("ReservePortCommand", Location=port_locations)

stc_session.perform("attachPorts")

stream_block = stc_session.create("streamBlock", under=port4_handler)
To be able to do it, we have to connect to the Spirent chassis. We’re doing it using the connect method. We have to specify the Spirent box IP address as an argument.
After that, we specify ports in a list called port_locations. It contains the IP address of the Spirent box and port location. To get each port handler, we have to create a Port object in the Spirent Test Center. For readability, I’ve assigned each port handler to a separate variable.
The next step is port reservation. Here we have the perform method used for the first time. As the argument, we have to specify action and their arguments, if required. In our case, we have to specify a list of port locations, that we want to reserve.
Right after that, we’re attaching them, again using the perform method. In this case, however, we don’t have to specify any additional arguments.
The last line of code creates streamBlock object. Its role is to define traffic flow in our environment.
Associations
It’s time to associate our configuration snippets with each other.
stc_session.config(port4_handler, **{"AffiliationPort-sources": [orgrimmar_device]})
stc_session.config(port2_handler, **{"AffiliationPort-sources": [undercity_device]})

stc_session.config(orgrimmar_device, **{"TopLevelIf-targets": [orgrimmar_ip]})
stc_session.config(orgrimmar_device, **{"PrimaryIf-targets": [orgrimmar_ip]})

stc_session.config(undercity_device, **{"TopLevelIf-targets": [undercity_ip]})
stc_session.config(undercity_device, **{"PrimaryIf-targets": [undercity_ip]})

stc_session.config(
    orgrimmar_ip, attributes={"StackedOnEndpoint-targets": [orgrimmar_eth]}
)
stc_session.config(
    undercity_ip, attributes={"StackedOnEndpoint-targets": [undercity_eth]}
)

stc_session.config(stream_block, attributes={"SrcBinding-targets": [orgrimmar_ip]})
stc_session.config(stream_block, attributes={"DstBinding-targets": [undercity_ip]})
We’re associating virtual devices with ports. Then we’re attaching ethernet and IP configurations to particular devices. At the end, we’re configuring the stream block specifying in which direction the traffic has to flow.
Traffic
Before spinning up our virtual devices, and starting traffic, we still have some actions to perform.
stc_session.apply()

stc_session.perform("DevicesStartAllCommand")
stc_session.perform("ArpNdStartCommand", HandleList=port_handlers)
The first one is applying our configuration, apply method was used for that.
Then, we can start our emulated devices using the perform method with DevicesStartAllCommand argument. It’s not necessary to perform the last action, but I like to do it, because right after that, we’re starting data traffic. By issuing ArpNdStartCommand virtual devices will exchange ARP packets with default gateways, so you won’t have any unnecessary delays or packet losses at the beginning of data traffic.
Now we’re ready to start our traffic.
print("Starting generator")
generator = stc_session.get(port4_handler, "children-Generator")
stc_session.perform("GeneratorStart", GeneratorList=generator)

TRAFFIC_GENERATION_TIME = 60
print(f"Waiting for {TRAFFIC_GENERATION_TIME} seconds")
time.sleep(TRAFFIC_GENERATION_TIME)

print("Stopping generator")
stc_session.perform("GeneratorStop", GeneratorList=generator)

stc_session.perform("DevicesStopAllCommand")
Generators are responsible for generating traffic flow. In our case, we have only one flow, from Orgrimmar to Undercity, so we have to start one generator.
To perform any action on it, we need a handler. We’re getting it using get method. The generator is present under traffic-sending port as its child attribute. After grabbing it, we’re performing the GeneratorStart action.
That action starts the traffic flow. In a few seconds, we’re observing rising counters on the Durotar router.
Durotar#sh int GigabitEthernet0/0/0 | include 5 minute
  5 minute input rate 20326000 bits/sec, 20487 packets/sec
  5 minute output rate 0 bits/sec, 0 packets/sec
With default generator and streamblock configurations, traffic won’t stop until you explicitly perform an action to stop it. In the script, I’ve used time.wait method to stop script execution for 60 seconds.
After that, we’re stopping the generator and all virtual devices.
Cleanup
It’s a good practice to clean Spirent rather than tearing down the connection.
stc_session.perform("ReleasePortCommand", Location=port_locations)
stc_session.perform("chassisDisconnectAll")
stc_session.perform("resetConfig", createnewtestsessionid=0)
stc_session.end_session()
First, we’re releasing reserved ports. Next, we’re disconnecting from Spirent Box. After that, the config is erased. The last step is tearing down the session.
You can view the complete code in the Spirent Automation Examples repository.
Summary
Basic traffic generation is just the tip of the iceberg when it comes to the Spirent capabilities. But even that takes a fair amount of code to automate. The life of a network automation engineer isn’t as easy as it may seem. But hey, after you get familiar with the code above, adding more on top of that becomes much easier. More on that in future articles.
2 thoughts on “Automate basic Spirent traffic flow with REST API in Python”